Hi, Jonny here, also known as itsjonnyfpv!
Some time ago Caddx, in collaboration with Insta360, launched the Caddx Peanut Action Camera. This small camera was specially developed for the FPV market and allows us to take good pictures even with smaller Tinywhoops. In this blog post, I will not only be looking at the specifications and functions of the Peanut, I would also like to show you a comparison between the video quality of the Peanut and a GoPro.
Specifications
Scope of delivery
Configuration with FC and remote control
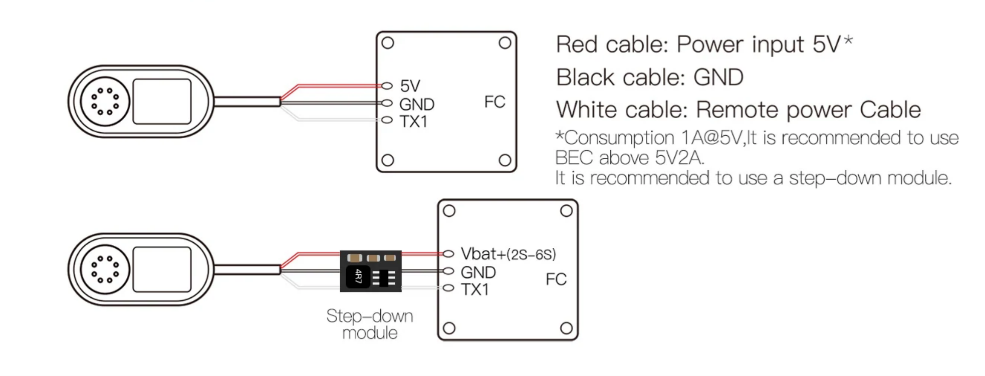
The Peanut uses two power supply modes: the built-in battery and a 5V external power supply via the supplied adapter. Like the new GoPro Hero 10 Bones, it supports start/stop recording by triggering a switch on the remote control. The following example shows a Betaflight F405 Flight Controller is used to illustrate the configuration for the remote control. The connection diagram is shown in the figure below. Caddx has kept the soldering of the cables to the FC relatively simple. The red cable, i.e. 5V, is soldered to a free 5V output on the FC, the black cable, i.e. GND, to an unused GND connection and the white cable to a TX connection. The TX connection can basically be chosen freely, but you must take this into account when configuring the switch in Betaflight, depending on where you have connected the TX.


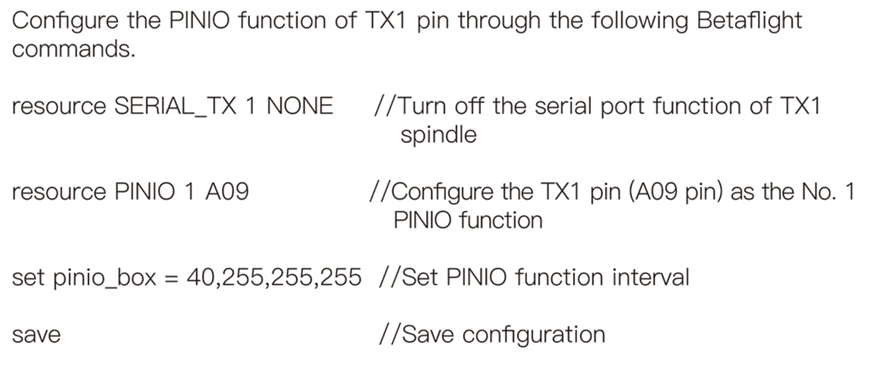
The following diagram configures the PINIO function mapping relationship between remote control and flight controller. In the Betaflight configuration, PINIO function number 1, hence USER1 in the diagram below, corresponds to the AUX channel of the remote control.

If you have gone through and completed the configuration correctly, you should be able to switch the Peanut on or off by pressing the selected switch on your remote control. I myself use the 2S-6S step-down module supplied, which I connect to the balancer plug of the LiPo. This variant has proven to be the best for me, as I can use the Peanut on several copters.
Functions
The Caddx Peanut is basically an Insta360 GO 2 with a few small but important upgrades that have made it an interesting camera.
Firstly, the Caddx Peanut can be powered by an external power source, which means that the recording time is no longer limited by the small built-in battery, allowing it to record for up to 30 minutes until the memory is finally full. The only thing the Peanut needs to be able to record for longer is a power supply of 5V, whereby you should ensure that your BEC is strong enough to supply the required current of around 1.2A during operation. You should also be aware that the camera does not have a micro SD card slot, so you should often download your recordings via the USB-C port or via the app to free up storage space.
The second major change to the Peanut is the price. As it doesn't come with a charging case compared to the GO 2, it's actually a lot cheaper than the GO 2.
It also comes with two ND filters, an ND8 and an ND16, which are essential for epic shots in direct sunlight. In contrast to some others, these are not attached to the lens, but are screwed directly onto the lens with a thread. This makes it very easy to change them and still not have the feeling of losing them during the flight.
The camera can also be controlled via smartphone using the Insta360 app, which gives us quick access to our settings (shooting modes, shutter speed, ISO, etc.).
One problem with the Peanut that I noticed very often is that the camera gets hot quite quickly. I therefore recommend that you only switch the camera on shortly before the flight or only start recording when you take off.
Caddx Peanut VS GoPro Hero 7 Black
One of the first questions that arose immediately after unpacking the Caddx Peanut was whether this little camera could keep up with the video quality of a GoPro. A few days later, I mounted one of my GoPro cameras and the Peanut on my freestyle copter to take a closer look at the footage from those cameras. To make the comparison clearer, I tried to set up the two cameras as similarly as possible.
What struck me immediately when looking at the images was the different dynamic range of the two action cameras. Especially when flying in darker areas, the Peanut's image quickly starts to become noisy. This is due to the fact that the GoPro has a larger sensor, which allows more light to reach the lens. I also tried processing both cameras (see video) with the same LUT, but again I found that I liked the GoPro's images better after color grading. I had better experiences with the Peanut, simply filming in standard mode instead of RAW mode.
Conclusion
If you're looking for a lightweight action camera for a freestyle session or two, then you definitely can't go wrong with the Caddx Peanut. The quality of the footage is also sufficient for cinematic shots for social media posts. However, if you need a camera for videos or films where it is important to have the option of recording in 4K or filming in 16:9 without leaving with a moderately good picture, then I recommend you go for a GoPro, DJI Action or other action camera.
See you soon,
your Jonny
Would you like to stay up to date?
Then subscribe to our FPV24 newsletter now!